Sorry I haven't been on lately. There has been a lot of things occupying my mind. First of all, I had to put away my dollhouse supplies so I would have room for Christmas preparations. Then this week I had to say goodbye to my cat Poppy. I knew the day was coming, but I was taken by surprise. I thought we would have a few more years together. Life's existing stress and disappointment is now mixed with grief. I don't know how I will get through the holidays If you come across this blog, I don't want you to think that it is abandoned or that I lost interest in my project. I hope to return sometime in early 2012 and, maybe, with a new muse in my life.
~D

Friday, December 16, 2011
Sunday, November 20, 2011
Haunted Dollhouse: Bathroom & B-Day Gift Update
I was reminded by my good friend that I haven't posted in a long time. "Every time I look all I see is the same Italian bread post," she commented. I know I haven't been on for awhile, other things have had my attention. I made sure to make time today to work on another room, the bathroom. My friend offered some ideas for this room that I would like to incorporate. So far I have the walls done and a clawfooted tub. Blue, to me, is the color for a bathroom. Not sure what to do with the floor, maybe grungy tile...? I need to think of how to do that. Vintage Tub & Bath has some great images of tubs, vanities, and other household furniture items. Do you think the tub is too big in comparison to the witch? I think it might be slighly to big but not sure...

Also, this is the completed b-day gift I posted about earlier here. It is a bottle of dragon's breath. My friend loves dragons and also loves the color cobalt blue. I got this gift idea from A Fanciful Twist. The idea is to place living flowers and greenery in a jar and seal it. Moisture, or "breath" is produced. Most of the weeds are dried up/dead in the Chicago area so I couldn't produce my own moisture so I added a little water, but it was either absorbed or evaporated. In the bottle I inserted dried weeds and flowers, different types of glitter and stretched out cotton balls to resemble smoke. I placed a wine cork in the mouth of the bottle and spooned wax from a melted candle over it to produce the look of a sealed bottle. The label I found on Graphic Fairy, and I glttered wooden stars that I had leftover from another project. My friend likes her gift very much and added it to her spice shelf. I can't think of a more suitable place!


One of the other gifts I included was a candle. I got the idea from The Polka Dot Closet. There is a great project on how to add an image to a candle. I didn't have a rubber stamp of a dragon, instead I printed an image onto tissue paper. You just need to tape tissue paper to a piece of paper so it will feed through your printer.

Sometimes homemade gifts can make the best gifts!
~D
Wednesday, November 2, 2011
Recipe: Italian Bread
I've seen recipes for Italian Bread and always wanted to try making a loaf -- a good Italian bread with a soft inside and a crisp, chewy crust. I found a recipe and adapted it to make one loaf. It is an easy recipe, and it doesn't take much time to prepare except for the time to rise twice. Bread is especially good with soup, may I suggest Butternut Squash Soup from Our Best Bites. I also made the soup over the weekend and it is wonderful!
____________________________________
Italian Bread
1 c. warm water
1/2 T. yeast
1/2 T. vegetable oil
1/2 T. sugar
2 3/4 c. flour
Dissolve yeast and sugar in warm water (check water temp on yeast packet) in a large bowl to proof or foam (about 10 minutes).
Add oil and 1 1/2 c. flour; beat for 2 minutes.
Stir in 1 1/4 c. flour to make a stiff dough.
Knead until smooth and elastic; about 10 minutes.
Place in oiled bowl, turn dough to coat all sides; cover and let rise until doubled.
Punch down and shape until a long, slender loaf.
Grease a cookie sheet and sprinkle with cornmeal.
Place loaves in an and cut diagonal gashes on the top of each loaf.
Cover and let rise until double.
Bake at 375 degrees for 20 minutes (maybe 30 minutes).
Spray with water during baking for a crunchy crust.
____________________________________


~D
____________________________________
Italian Bread
1 c. warm water
1/2 T. yeast
1/2 T. vegetable oil
1/2 T. sugar
2 3/4 c. flour
Dissolve yeast and sugar in warm water (check water temp on yeast packet) in a large bowl to proof or foam (about 10 minutes).
Add oil and 1 1/2 c. flour; beat for 2 minutes.
Stir in 1 1/4 c. flour to make a stiff dough.
Knead until smooth and elastic; about 10 minutes.
Place in oiled bowl, turn dough to coat all sides; cover and let rise until doubled.
Punch down and shape until a long, slender loaf.
Grease a cookie sheet and sprinkle with cornmeal.
Place loaves in an and cut diagonal gashes on the top of each loaf.
Cover and let rise until double.
Bake at 375 degrees for 20 minutes (maybe 30 minutes).
Spray with water during baking for a crunchy crust.
____________________________________
(Please ignore the dirty oven!)
Ohhhh... The anticipation! Can't wait!

The recipe suggested spraying the loaf with water during baking for a crunchy crust. I did it after placing the loaf in the oven and three more times at 5 minute intervals.
Oh, yea, that's the good stuff!
Put way too much butter on my slice!
Mmmm.... warm bread with melty butter....

Italian Bread & Butternut Squash Soup

The bread is very good. The inside is soft and moist while the crust does have a crispness to it. It is not like a good Italian Bread that is bought at a bakery or at some grocery stores. I would love to know the secret to creating the bread with a crisp and chewy crust. Does anyone have any ideas? Do you know a good Italian bread recipe? If so, please post the link and ideas.
Saturday, October 29, 2011
Art & Crafts Project: Halloween 2011 & B-Day Teaser
Finally I finished a project for my door. Projects always take longer than expected! Creating the background was the most fun... paper, glue, apply paint and wipe away some of it away... I am not very good at drawing. I found images online and resized them. Then I printed the images, cut them out, traced, painted, wiped away paint and threw on a light dusting of glitter. Finished off with ribbon.


Also this past week, I've been working on a b-day gift. I got the idea off another blog. I won't reveal the gift until my best friend receives it because she is a Google Buzz lurker. But here is a sneak peak for everyone and a teaser for her!...

What can it be? Well, besides the obvious, a cobalt blue bottle (she loves cobalt blue). Hmmm.... Glitter stars.... Hmmm... Any ideas?

Is that glitter in the bottle? And... What is the rest? Hmmm....
~D
Sunday, October 23, 2011
Geese
The geese have been gathering and honking away for a few weeks now. At certain moments the crescendo is quite loud, espeically when I have the door and window open. I always turn my head toward the lake and wonder what exactly is going on out there. What are they saying to one another? Are they deciding everyone's position in the "V" for their journey South?... At least for those who actually go South. Are they arguing over a departure date? When I first moved here, the lake and land were packed with geese and ducks, I never saw so many ducks and geese in one place, but now, the numbers have decreased. I didn't even see any ducks today, just geese. This picture only shows a small amount of the geese that are actually out there on the lake.

Oh, look, a lucky penny!
Find a penny,
Pick it up,
All the day,
You have good luck!

I put this penny on my balcony railing this past Spring. Heads-up, of course! I never remember it is there (like today), and when I see it, it takes me by surprise for a moment before remembering how it got there. Regardless, I say to myself, Oh look, a lucky penny! Find a penny, pick it up, all the day, you have good luck! But I never pick it up, I leave it there to be found yet another day. Hope it survives thru the Chicago winter. If it does disappear, hopefully, it brings the finder luck.
Anyway, I hope to have a project and card to share later. I am busy with the three C's -- Cooking, cleaning and crafting!
~D
Sunday, October 16, 2011
Haunted House: Dining Room Chairs
Finally I finished two chairs! They have been a challenge and I walked away from the project for awhile. I've been busy with other projects and cards. I talked myself into finishing the chairs today and hope to start another dollhouse project this week.
 I've had trouble with the chair legs. They won't stand straight and when I try to brush the glue webs away, they fell apart. <Grrr...!> I completed two chairs and decided to call this project finished!
What dollhouse project should I start next? Hmmm... Muse, muse! My dearest Muse....

What dollhouse project should I start next? Hmmm... Muse, muse! My dearest Muse....
Saturday, October 8, 2011
Altered Book, Writing Journal & My Dearest Muse: Ode to My Muse
My best friend and I exchange writing journals. We make identical journals and give the other person the second one. Along the way, we exchange completed writing exercises. Once the journal is full, the other person creates the next set of journals. Presently, we are on our third journal. In journal two, there is a writing exercise that has you writing your muse a letter asking for help to write the next great American novel. I used that exercise for a page in my altered book. My first cat Oscar was my original muse. He is no longer here with me on earth, but I know he is with me in spirit. I used the letter from the writing journal for a page in my altered book but made changes so I am asking for help in creating a mixed-media dollhouse. I also included an extra letter. The person featured is holding an envelope containing the letters. There are a number of websites with envelope templates. Here is the letter adapted from the writing journal:
My Dearest Muse,
Thank you for being such a wonderful help to me! By providing me with inspiration, my writing and art have improved tenfold!
Now I am faced with the greatest challenge of my life! I am attempting to create a mixed media dollhouse. I know I will have a difficult road ahead of me, but I know I will persevere with your aid. I hope I can count on you to be with me during the long hours I will be spending with paint, glue, paper, fabric, balsa, glitter...
Your help, my dear muse, will be greatly appreciated.
Your humble underling,
Deborah

Sunday, October 2, 2011
Recipe: Chocolate Pudding
I love pudding, and I love it chocolate! I sometimes eat the fat-free variety at work, but I decided I need homemade pudding this weekend. To avoid pudding skin, it helps if you cover with plastic wrap and allow the plastic wrap to touch the surface of the pudding.
Chocolate Pudding
1/3 c. sugar
1/4 c. cocoa
3 T. cornstarch
1/8 t. salt (I skip)
2 c. skim milk
1 t. vanilla
Mix first four ingredients. Over medium heat, whisk in milk until smooth. Continue stirring until thickened, maybe 5-7 mins more. Remove from heat and stir in vanilla. Pour into four individual serving dishes (or one bowl if you don't plan on sharing :) ) and allow to cool. Refrigerate untiul serving. Garnish with whipped cream, if desired.

I am still working on the chairs. I know how I want them to look, but I am having problems with the execution...
Saturday, October 1, 2011
Haunted Dollhouse: New Table
I decided to make a new table, The old one seemed too short. I stained the pieces with oak Gel Stain by Americana. It is easy to use, brush on & wipe off. Glued everything with hot glue. Just dipped the pieces in the puddle of glue dripping from the gun.

I had sustained my first dollhouse injury! I was pressing too hard on my craft knife when the blade broke and embedded itself a little bit in my finger. All along I was betting my first injury would involve the glue gun! Anyway, I persevered :) with disinfectiant and a bandage and completed the table. I like the new table very much.


I had sustained my first dollhouse injury! I was pressing too hard on my craft knife when the blade broke and embedded itself a little bit in my finger. All along I was betting my first injury would involve the glue gun! Anyway, I persevered :) with disinfectiant and a bandage and completed the table. I like the new table very much.

Back to the chairs!
Wednesday, September 28, 2011
ATCs
I began creating ATCs in 2009. The book Artist Trading Card Workshop: Create, Collect, Swap by Bernie Berlin had been, and still is, a wonderful resource. The book contains so many ideas, techniques, and is a wealth of inspiration. I even used some of the ideas for greeting cards. There is a local scrapbook store near me that hosts monthly ATC swaps where I had participated in swaps in the past. Isn't that the whole idea behind ATCs? Create the cards, swap with others (don't keep them!) and collect other participants' work? I really want to return to swaping. Here are a couple of favorites I have made.
The image comes from a picture that was in the newspaper. I lightened it with a watered down layer of white gesso then filled in with details! It's a lot of work. The wording is from an old book of short stories that I am altering. When I tear pages out of the book, I save them for other projects. It's funny how I am not sure what I want an ATC to say, but then I look through the extra pages and words just pop out at me. Does this happen to anyone else? This card is waiting to be swapped when I return to the group one day, hopefully soon.
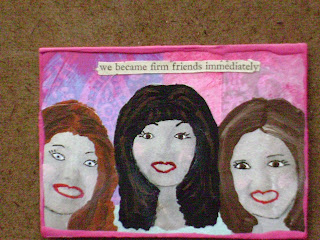

The image comes from a picture that was in the newspaper. I lightened it with a watered down layer of white gesso then filled in with details! It's a lot of work. The wording is from an old book of short stories that I am altering. When I tear pages out of the book, I save them for other projects. It's funny how I am not sure what I want an ATC to say, but then I look through the extra pages and words just pop out at me. Does this happen to anyone else? This card is waiting to be swapped when I return to the group one day, hopefully soon.

Don't we all have a dorky class photo...or two? Yes, admit it! We all do! I combined a photo from a newspaper with one from a magazine. I printed the "Class Photo" wording out on tissue paper using the Courier font. When I first designed this particular ATC, I found myself a little freaked out at the image (I wasn't planning it to resemble a class photo), but I also laughed out loud. Sure she is smiling, but she doesn't appear to be comfortable with herself, with the skin she is in, what traits she was given. She seems a bit expectant and maybe anxious. I no longer have this card, but whenever I look at this photo (I am so glad I have a photograph every card I have made), it makes me smile and laugh a little. Oh, those awkward years...

Saturday, September 24, 2011
Haunted Dollhouse: Dining Room Picture Window

I found remnant fabric at Jo-Ann's. I chose a gauzy yellow-gold for the drapes. I judged the size, cut 2 panels, and doubled the length. I folded the panels in half and glued the ends and glued on trim.

For the curtain rod, I used another strip of balsa and decorative wood knobs left over from another project. I painted the wood antique gold but it didn't look aged so brushed the rod with watered down dark brown paint.

To make the drapes appear old, I watered down dark brown paint and painted the curtains. If an area had too much paint, I just added water. I hung them over a long handled paintbrush to dry. Once dry I rubbed the curtains with sandpaper to fray. I realized nothing has to be perfect, it's okay if they don't hang evenly or if the trim hangs unattached in areas. I didn't even measure, I just eyed all of my cuts. The drapes just need to look as if they have been hanging in the window for years, maybe even decades, and are deteriorating with age and sun and water damage. I tacked down the drapes here and there so the trick-or-treaters can be seen peering through the window. The drapes are a bit pouffy but will probably settle with time or maybe they give the appearance of billowing from the wind through an open or broken window. Don't all haunted houses have open/broken windows? I know I would jump with fright if I saw trick-or-treaters looking through my window! There is just something eerie about vintage costumes, especially the homemade ones. Trick or Treat...!

"Hey lady, open the door! We want our treats!"

Sunday, September 18, 2011
Haunted Dollhouse: A Dining Room Table & A Character

Friday, September 16, 2011
Haunted Dollhouse: The Dining Room
I finished the walls, ceiling and floor (just have to glue down the carpet) of the dining room! At Jo-Ann's I found sheets of suede with the scrapbook papers. Never notice them before and thought the dark red would make nice carpeting for the dining room. For the ceiling, I painted it ivory and stained it with Instant Age Varnish by Delta Ceramcoat. It's with the craft paints in the same type of bottle. I bought it years ago, and I don't have much left. I hope they still make it!

The piece of balsa wood I am planning on using for the table top. My goal is to finish the table this weekend!


Sunday, September 11, 2011
A B-Day Card ~ Nuts!
I did not get a chance to work on the dollhouse this weekend so I thought I'd share a card I made for my mom for her last birthday. Since she was born on Christmas, I give her something nice for Christmas but try to make her birthday gift clever, funny, unique...
I covered the inside and outside of a card with scapbook paper. Then I cut peanuts in half and glued them to the card and added glitter and wrote "NUTS!" with dimensional paint.
 The inside:

I covered the inside and outside of a card with scapbook paper. Then I cut peanuts in half and glued them to the card and added glitter and wrote "NUTS!" with dimensional paint.


Yes, the cat gets to sign the card too! The gift was an assortment of nuts, as many different types (peanut, almond, cashew, pecan...) and flavors (spicy, chocolate covered, toffee, Parmesan...) I could find. The idea came to me last summer, and I started shopping for the nuts then. Every store (Jewel, Piggly Wiggly, Walmart, Big Lots, Marshalls...) I went in I would check their selection of nuts. Mom loves to snack on nuts so the gift was well received.
Thursday, September 8, 2011
Haunted Dollhouse: The Beginning...The Gathering...
From the moment I opened "Mixed-Media Dollhouses: Techniques and Ideas for Doll-size Assemblages" by Tally Oliveau and Julie Molina, I knew I wanted to make a dollhouse of my own. I love how imaginative they are! The possibilites are endless. I wondered, What type of dollhouse would I like to make? Many thoughts flew around in my head. Then I stumbled upon the blog Artful Affirmations. The fairy schoolhouse is beautiful! The tutorials are very helpful (especially the one on making furniture) and provided more creative thought. I had visions of multiple dollhouses...a street...a town... But, of course, this all starts with one single dollhouse. I really like the castle and gothic dollhouses in "Mixed Media Dollhouses" and also thought about a fairy dollhouse. Since it is September, the beginning of fall, I decided to start with a gothic or haunted house. Which is funny because I hate horror movies and the emotion of being scared, but I think a haunted house will be a fun way to start, a haunted house that is more fun that scary. I don't have much faith in finishing by Halloween, but I will give it my best effort.
I gathered some larger and heavier shoeboxes. In "Mixed-Media Dollhouses", they suggest cigar boxes or wooden photo boxes. Size doesn't matter--different heights or widths are fine and look great stacked together. I just have a hard time planning this out in my head. What room should be which size? Which box? Should different sized boxes have figures, furnitures and fixtures scaled differently? I always like to plan everything in my head ahead of time. Then I took a trip to Jo-Ann Fabrics. They had cardboard photo boxes on sale 2/$5, reg. price being $3.99 each. I bought four to start with. I like the idea of having all the rooms the same height, width, and depth. If I need a bigger room, I can always take out a "wall", which they show in "Mixed Media Dollhouses". If things go well this time, maybe next time I will use the shoeboxes. I went through my craft supplies and gathered scrapbook papers, fabric and glitter. I've considered what would be a good fit for a haunted house. Not sure how to fit glitter in to the mix, but I'll figure something out. There has be glitter somewhere! I also found some interesting clip art. If you have any ideas for the glitter, please let me know!

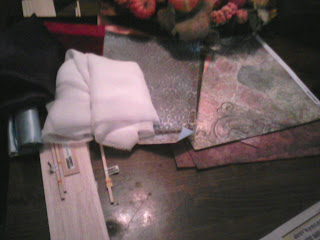
I gathered some larger and heavier shoeboxes. In "Mixed-Media Dollhouses", they suggest cigar boxes or wooden photo boxes. Size doesn't matter--different heights or widths are fine and look great stacked together. I just have a hard time planning this out in my head. What room should be which size? Which box? Should different sized boxes have figures, furnitures and fixtures scaled differently? I always like to plan everything in my head ahead of time. Then I took a trip to Jo-Ann Fabrics. They had cardboard photo boxes on sale 2/$5, reg. price being $3.99 each. I bought four to start with. I like the idea of having all the rooms the same height, width, and depth. If I need a bigger room, I can always take out a "wall", which they show in "Mixed Media Dollhouses". If things go well this time, maybe next time I will use the shoeboxes. I went through my craft supplies and gathered scrapbook papers, fabric and glitter. I've considered what would be a good fit for a haunted house. Not sure how to fit glitter in to the mix, but I'll figure something out. There has be glitter somewhere! I also found some interesting clip art. If you have any ideas for the glitter, please let me know!


Subscribe to:
Posts (Atom)